Ceramics blog
Repairing bone dry clay with slip
Jul
In this video, I’ll show you how I repair bone dry clay with slip. It’s not yet fired. This is more for a beginner level.
I sometimes break one of my clay animals at the bone dry stage. Dry clay will always break easily, even more so with tiny detailed pieces. Clay figurines sculptures for smaller pieces is tricky, and I had to adapt my production for the pandemics. That’s why a lot of transport is now involved as I sculpt at home and only bring the bone dry pieces to the studio in order to fire them.
I move the pieces at their weakest stage more often than not . So when breaks happen, I use slip or vinegar to fix a lost ear, limb or antler, as I’ll explain in this video. I added the English transcript afterwards for more detailed info.
What is bone dry clay ?
Bone dry clay is the dry stage of clay. When you sculpt or throw a ceramic piece, it’s always loaded with water. This makes the material plastic enough for us to shape it how we want. When left alone, the clay dries, water evaporating. This leaves only the clay, which becomes porous and very fragile at that stage. This is usually when I have to transport them to the studio too, so I have my fair share of broken bone dry clay along the way. I found ways to protect bone dry clay during transport though.
What are the stages of clay in order ?
- Soft / Fresh clay
- Leather hard
- Bone dry / Greenware
- Bisque fired(1st firing)
- Vitrified (2nd firing or Glaze firing)
How to repair unfired clay, step by step
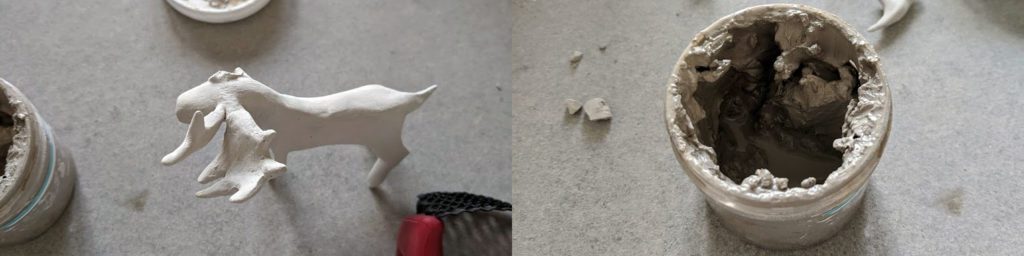
Hi ! Today I’ll show you how to repair a broken bone dry clay sculpture.
It’s not yet fired but it broke while I moved it. The little moose lost its antlers. Here they are.
Bone dry clay and slip repairs
There are two methods, one with slip. Slip is a clay and water mix. The other method includes white vinegar. We mix dry clay and white vinegar that we can use as a glue. The main difference is that the vinegar mix will dry a lot faster. The fix will be quicker but might not be as sturdy as with slip. The slip will take a bit longer but might be a little sturdier.
These are quite big considering my usual work so I think I’ll use the slip. It’s exactly the same technique, you just have to be quicker with vinegar. I’ll start with the biggest antler. It’s kind of ugly at first. It’s ok. I put slip on both sides and then I put them together and wait a few seconds. Just after that, I’ll smooth it out with a brush. It shouldn’t be too moist in order to let the clay stick together.
Smoothing it out with a brush
Here we see it made a bit of a mess, I’ll smooth it with the brush. I find it better to work it with a tiny bit of water in order to put no pressure on the repaired part. Once fixed, these will be very very fragile. Even more so than regular bone dry clay dried without repairs. On this kind of piece, this is what will break the easiest. A small base will always try and break apart.I’m adding a bit too much here and then searching an angle to attach it here. It’s important to try and get the largest surface possible to attach your repairs. But as I added a lot of slip here I don’t see what I’m doing precisely. So I’ll try and recreate a kind of large spot in order for it to be a bit sturdier.
Planning for the next steps : glazing, firing
On this piece, I know that the underglaze painting might be delicate on this really fragile part here. So I’ll try and be extra careful… or I’ll forget as I usually do 😀 And I’ll repair it a second time.
Here, it’s fixed. It’s quite quick so you’ll have to pay attention and work with the driest brush possible and try and get the neatest result on the first try,because after that you will not be able to use any other tool than a brush it will break under a knife or a silicone brush.You can also use another method with this kind of repaired piece,and you can bisque fire it before underglazing it. That would allow a stronger piece to put color on.
Et voilà for this little moose !
Repairing unfired clay makes a piece more fragile
A repaired piece will never be as sturdy as a whole piece. If your tableware piece has cracks for example, it would save time, energy and work to simply recycle it and make a new one. You can break it further to study your walls thickness and consistency: it will help you throw more evenly and spot weaknesses in the future.
Bone dry clay cracks
A crack spotted at the bone dry clay stage is unlikely to set itself. It will expand and grow to a full hole, especially for bottom S shaped cracks. Again, recycling the piece and making a new one will save so much time and material and energy.
Why is My Pottery Cracking and How to Fix Cracks in Clay
Cracks happen when a part of a piece dries quicker than the other. It creates tension between the dry and wet parts, and that is when cracks happen. To prevent cracking :
- make sure your thrown pieces don’t have any water left in them,
- make sure your pieces have as much of an even thickness as possible
- the larger your piece is, the longer the drying time, avoiding uneven drying is key
- compress bottoms and edges as much as you can while throwing.
When attaching handles, you can either slow dry them, or protect the attached spots with plastic film while the rest dries.
Throwing evenly will also help tremendously, if your bottom and walls are even, you won’t see as much tension while the piece dries.
Lastly, some clays are finickier than other and will crack if you so much as look at them wrong so test the best materials for your practice.
How to attach wet clay to bone dry clay ?
It’s near impossible, because the moisture difference in the two parts will create a crack very quickly. You can attach dry or wet, but the two parts need to be at the same drying stage. The ideal attaching stage for clay is leather hard. You can try and return your dried out piece to a more moist stage by putting it into a damp box for several days and then try and attach your two pieces together.